Pages

Thursday, March 31, 2011

Pizza-Dillas

Sometimes, a good ol' restaurant meal is just what a gal needs. Am I right?

For starters, we all love those favorite menu items that we just can't replicate at home. Edamame Dumplings with Shiitake-Ginger Sauce. Or that amazing Blue Cheese-Garlic Penne with Roasted Broccoli and Walnuts.

My mouth is watering just thinking about it.

And the whole not-having-to-do-the-dishes thing? Priceless.

And let's not forget that special treasure trove on the menu that is too often overlooked by us "adults." That's right: I'm talking about Kids' Menu. It's loaded with food that reminds you of days when Lisa Frank was your favorite artist... and your fashion idol was Clarissa from "Clarissa Explains it All."

Er, wait--maybe that was just me.

Anyway, the point is that Kids' Menus are rich with creative possibilities that you
can re-create at home.

Case in point: Pizza-Dillas--a pizza-licious take on quesadillas made by one of my favorite local spots, Black Bear Burritos.

We made these last week for a quick n' easy dinner, and we loved them. I honestly wondered why we hadn't thought of such a tasty take on pizza before.

Now if you'll excuse me, I need to go get my Lisa Frank art set and sit down for an episode of Clarissa.

What was your favorite kids' menu treat?

Pizza-Dillas

Sometimes the Kids' Menu is just more fun. All you need for this Italian-American-Mexican hybrid of a dinner is your favorite pizza toppings, plus whole wheat tortilla shells. Easy-peasy!

Ingredients:
  • Whole wheat tortilla shells
  • Your favorite marinara sauce
  • Part-skim mozzarella cheese, shredded
  • Your favorite pizza toppings (we used bell pepper and onions)
  • Italian seasoning
  • Fresh garlic, minced
Directions:
Heat a dash of olive oil in a large skillet. Spread one half of a tortilla shell with marinara sauce. Sprinkle cheese and other toppings on top. Sprinkle with Italian seasoning in garlic. Fold tortilla in half and place in the heated skillet. Cook for about 2 - 4 minutes over medium heat, until golden brown on the bottom. Flip and cook until the other side turns golden brown. Enjoy your inner-child for the evening :)

Tuesday, March 29, 2011

Power Up!

I'm so excited to share this recipe with you, I'm seriously about to burst. We're talking Energy Balls, friends--and darn good ones at that.

These little treats may be smaller than a golfball, but they sure pack a powerful punch. Forget your Lara Bars. Toss that granola out the window. Today's recipe will give new meaning to your mid-morning snack.

I discovered these little gems on Kat's blog--a mere week after I tested (and devoured) her Peanut Butter Cups. I call 'em Energy Balls because they're the perfect post-workout fuel and they definitely give you the energy needed to power through work until your lunch break.

Best of all, with only 1 tablespoon of honey, they're short on added sugar. Yet, miraculously, they also satiate my sweet tooth. Bonus points!

Enough talk. You need some energy, and I've got just the solution...

Energy Balls
(recipe adapted from Kat's at Keep n' the Faith)

These bite-size energy treats will give you just the pre- or post-workout fuel you need. They also serve as the perfect after-work snack...or crumbled on top of banana soft serve.

Ingredients:
  • 1/2 cup oats
  • 1/4 cup sunflower seeds, toasted (unsalted)
  • 1/2 cup dried cranberries, chopped
  • 1/3 cup cooked quinoa
  • 2 - 3 TBSP ground flaxseed
  • 1/2 cup almond or peanut butter (I actually used 1/4 cup almond butter and 1/4 cup peanut butter)
  • 1 TBSP honey
  • splash of vanilla extract
Directions:
Mix all ingredients together. Add more dry or wet ingredients if needed to reach your desired consistency. Roll into balls and eat up :)

Sunday, March 27, 2011

Company-is-Coming Breakfast

The March 2011 Daring Baker's Challenge was hosted by Ria of Ria's Collection and Jamie of Life's a Feast. Ria and Jamie challenged the Daring Bakers to bake a Yeasted Meringue Coffee Cake.

The next time you have company visiting overnight, you MUST make this Coffee Cake. Seriously. It's going to be a new company-is-coming breakfast requirement at your house. It definitely is at mine.

Once again, the
Daring Bakers put my baking skills to the test with a delightful treat I'd never heard of, much less attempted in the kitchen. This breakfast ring is essentially a yeast coffee cake, filled with chocolate and nuts.

It tastes like a chocolate-loaded pastry straight off the rack at Panera. Only ten times better.

And honestly, it wasn't near as difficult as I expected (far easier and less awkward to work with than the
Stollen). The best part? Definitely the ooey gooey chocolate in the middle, which firms up beautifully once the bread has cooled.

We've all got our company-is-coming breakfast treats. Growing up, my mom always made Cinnamon-Sugar Monkey Bread for breakfast visitors. I hadn't found my own visitor breakfast niche yet...until I baked this baby last week.

Consider my niche found.

Yeasted Meringue-Chocolate Coffee Cake
(recipe from Jamie at Life's a Feast)

Dough Ingredients:
  • 2 cups flour
  • 2 TBSP sugar
  • 1/4 + 1/8 tsp. salt
  • 1 - 1/8 tsp. yeast
  • 1/4 + 2 TBSP milk
  • 2 TBSP water
  • 1/4 cup butter at room temperature
  • 1 large egg
Meringue Ingredients:
  • 2 egg whites
  • 1/8 tsp. salt
  • 1/4 tsp. vanilla
  • 1/4 cup sugar
Filling Ingredients:
  • 1/2 cup chopped pecans
  • 1 TBSP sugar
  • 1/4 tsp. cinnamon
  • 3/4 cup semi-sweet chocolate chips
Topping:
  • More semi-sweet chocolate chips! (about 1/2 - 3/4 cup?)

Directions:
1) In a large mixing bowl, combine 1 cup flour, sugar, salt and yeast. Set aside.

2) In a small saucepan, combine the milk, water, and butter and heat until just warmed and the butter is melted.

3) Add the butter mixture to the flour mixture with your mixer on low speed. Mix until well-combined. Increase mixer speed and beat for about 2 minutes. Add egg and 1/2 cup flour and beat for another 2 minutes.

4) Stir in the remaining 1/2 cup of flour. Turn dough onto a lightly floured surface and knead for 8 - 10 minutes until it is smooth and elastic (add more flour as neeeded).

5) Place dough in a bowl coated with cooking spray and turn to coat. Cover the bowl and allow it to rest in a warm place, undisturbed, for an hour (it should double in size).

6) Meanwhile, prepare your filling: Combine the cinnamon and sugar together in a small bowl.

7) Once the dough has doubled in size, prepare your meringue: Beat the egg whites and salt together on high speed until light and foamy. Add the vanilla, and start adding the sugar 1 TBSP at a time. Continue beating until stiff, glossy peaks form.

8) Line a baking sheet with parchment paper and preheat the oven to 350 degrees. Punch dough down and roll into a rectangle (about 20 x 10 inches). Spread the meringue over the rectangle, leaving a 1 - 2 inch border around the edges. Sprinkle the cinnamon-sugar on top, then the nuts, and then the chocolate chips.

9) Roll the rectangle up, jelly-roll style, from the long end. Transfer the rolled log (funny terminology, isn't it?) onto the prepared baking sheet, seam-side down. Pull the two ends together to form a wreath/ring shape, and pinch the edges together to seal. Use a sharp knife to cut slits around the ring, a few inches apart from each other.

10) Cover the coffee cake ring with plastic wrap and set in a warm place for about 60 minutes to rise.

11) Bake for 25 - 30 minutes, or until golden and risen.

12) Once the coffee cake has cooled, melt the chocolate chips in the microwave. Spread or drizzle over the top of the coffee cake and allow to cool and solidify before serving.


Saturday, March 26, 2011

White Bean + Walnut Vegan Spread


Friends, you know how wild I am about sandwiches. A truly delicious vege-head sammie makes my heart sing songs of joy.

Tonight, my heart could have easily beat the cast of Glee in a sing-off.

Inspired by my Veganomicon cookbook, I created a vegan White Bean - Walnut spread as the featured centerpiece of our sandwiches. Adam roasted corn and tomatoes and--of course--we sauteed some bell peppers, onion, and garlic to go with.

Vegan Sammy Paradise, I tell you.

The sandwich spread could easily double as a veggie or cracker dip. It's loaded with all kinds of savory goodness. Make it, eat it, and thank me later.

With that, I'm off to play a mean game of Scrabble, with a little "Despicable Me" on in the background. Didn't you hear? That's what all the cool kids are doing on Saturday nights now :)

White Bean - Walnut Dip
(inspired by Veganomicon cookbook)

This quick spread makes for a fabulous sandwich condiment, or a dip for veggies and crackers.
Ingredients:
  • 1 can Great Northern beans, rinsed and drained
  • dash of olive oil
  • 1 large onion, diced
  • 4 cloves garlic, minced
  • 3/4 cup walnuts, chopped and toasted
  • 1 tsp. dried thyme
  • 1 tsp. balsamic vinegar
  • black pepper and salt, to taste
Directions:
1) Heat a dash of olive oil in a skillet over medium heat. Add onion and cook for 3 - 4 minutes. Add garlic and thyme and cook for an additional 2 minutes. Remove from heat.

2) Place walnuts in a food processor and process until they turn into course crumbs. Add beans and process until smooth and well combined. Add remaining ingredients to food processor and process until smooth and well-combined.

Wednesday, March 23, 2011

PB Cup Blizzard...Non-Dairy, Dark Chocolate Style

It's no secret that chocolate + peanut butter is one of my weaknesses in life.

Faced with a jar of natural nut butter and a side of chocolate, I'm utterly defenseless. Any sense of restraint or self-control I once had goes out the window.

Give me a spoon, and let's get this job done.

Fortunately, many of you share my addiction. When I saw Kat's recipe for a homemade Peanut Butter Cup Blizzard this weekend, I was instantly hooked. So hooked in fact, that I went in the kitchen and made these tasty little treats the very same night.

I must warn you though: These treats are most definitely for the dark chocolate lovers out there, such as myself. They're apparently not designed for someone who requires super-sweet, milk chocolate. I realized this when Adam took a bite and scrunched up his nose. "What kind of chocolate did you use?"

It's called cocoa powder, buddy. It doesn't come in the form of a Hershey bar, a brownie, or a chip.

Oh, husbands.

Kat's recipe made 5 - 6 soft mini peanut butter cups. They don't fully solidify, so you might need a spoon if you choose to eat 'em on their own. I whipped up a batch of banana soft serve though, and tossed in 2 peanut butter cups to complete my rockin' blizzard.

Dairy Queen may never see me again.

Peanut Butter Cup Blizzard...The non-dairy, dark chocolate way
(recipe adapted from Kat's at Keep n' The Faith)

These PB cups won't freeze solid--they stay a little soft, which is a-okay since you're tossing them into a bowl of whipped banana goodness. I apologize for not having a picture of the Blizzard itself--I gobbled that baby up before I had time to snap a pic!

Ingredients:
  • 2 TBSP unsweetened almond milk
  • 1 - 1/2 TBSP honey
  • 3 - 1/2 TBSP cocoa powder
  • natural peanut butter
  • 1 recipe banana soft serve
Directions:
Melt the honey and milk together. Stir in cocoa powder until desired consistency and flavor is reached (you can add more cocoa powder if you like!). Spoon a small amount of chocolate mixture into the bottom of 5 mini muffin cup liners.* Place a tiny dollop of natural nut butter on top. Spoon the remainder of the chocolate on top of the nut butter. Freeze over night (if you can wait). Enjoy plain, or stir into your banana soft serve for a blizzard-like treat!

*Alternately, if you'd like your PB cups to solidify more, you can stir some nut butter right into the chocolate mixture and THEN poor the mixed version into the muffin cup liners.


Tuesday, March 22, 2011

Waldorf Re-Mix

I'm a sucker for salads that include both veggies and fruit.

Add some toasted nuts into the mix, and I just may reach food nirvana (I just invented food nirvana. Don't question it.).

So when I stumbled upon a recipe for Waldorf Salad in my Moosewood Restaurant's Low-Fat Favorites cookbook, I knew it would be a winner in our house.

This salad combines the best parts of an old-school Waldorf Salad (fruit + veggies + nuts), while nixing the less-than-desirable part (creamy over-the-top mayonnaise sauce). Instead of the creamy sauce, we go with a light, oil-free orange juice dressing.

Paired with spinach salad and a slice of Irish Soda Bread, this was an easy dinner to pull together. The salad is quite reminiscent of one of my ol' favorites: Apple-Almond-Bulgur Salad. I noted few differences between the two, although I found the Waldorf Salad a bit more filling and suitable as a "main course" salad.

Eat up, friends, and enjoy this hearty salad while it lasts. Tomorrow? We're talking homemade (and arguably "healthy?") peanut butter cups.

Stay tuned.

Waldorf Salad, Re-Mixed

The one things missing from this delightful salad? Grapes! If you have them on hand, I recommend halving a handful and tossing them right into the mix.

Salad Ingredients:
  • 2 cups cooked brown rice
  • 1 cup chopped celery
  • 1 - 1/2 cups diced apple
  • 1 bell pepper, diced
  • 1/2 cup dried cranberries or raisins
  • 3 TBSP lemon juice
  • 1/3 - 1/2 cup toasted almonds, chopped
Dressing Ingredients:
  • 1/2 cup orange juice
  • 1 TBSP honey
  • 1 tsp. ground coriander
Directions:
Combine salad ingredients in a large bowl. In a small bowl, whisk together dressing ingredients. Pour over salad and stir to coat. Enjoy!

Monday, March 21, 2011

Irish Soda Bread

I know, I know: I'm almost a week behind the whole St. Patrick's Day bandwagon.

But it's never too late for a new bread recipe, right? And a bread recipe that requires no rising? I'm all over it.

Enter Irish Soda Bread. I was put to task to bake this sweet, raisin-studded bread for our local food co-op's Spring Open House. I'm not sure what possessed me to volunteer for a baked good that I'd never made before, but I'm
so very glad I did.

Here's the run-down on this luck o' the Irish loaf:
  • It's super-easy: Mix dry ingredients, cut in butter, mix-in wet ingredients. Voila!
  • It's dense n' moist--easy to cut, perfect texture
  • It's just sweet enough. It'll curb your crave for sugar, without doing the damage of a Cookie Dough Blizzard (although, I'm not necessarily opposed to Blizzard-related body damage)
  • The raisins are a tasty addition. How do I know? Adam refuses to eat baked goods with raisins baked in (weirdo, right?)...but he loved every last crumb of this lucky loaf :)
  • It tastes DELICIOUS! This is really the only bullet point you need.

So friends, while green beer may be last week's news, and meaty Irish stew is so out-of-style, the goodness of Irish Soda Bread comes all year long.


Irish Soda Bread
(adapted from this original recipe found at Foodnetwork.com)

My favorite way to eat this bread is spread with a thin layer of butter on each slice. The original recipe also calls for Caraway seeds--I opted out because I'm not a huge Caraway fan. But if you're a Caraway-lovin' gal (or guy), go for it!

Ingredients:
  • 2 - 1/2 cups unbleached, all-purpose flour
  • 1/4 cup + 2 TBSP sugar
  • 1 tsp. baking powder
  • 3/4 tsp. salt
  • 1/2 tsp. baking soda
  • 1/4 cup butter
  • 1 cup raisins
  • 1 - 1/4 cup milk
  • 1 large egg white
Directions:

1) Preheat oven to 350 degrees and coat a loaf pan with cooking spray.

2) Combine dry ingredients in a large bowl. Cut in butter until mixture is course and crumbly. Stir in raisins. Beat in milk and egg white until thoroughly combined. Pour into loaf pan and bake for 60 minutes, or until toothpick inserted in the center comes out clean.

3) It's really that easy!

Saturday, March 19, 2011

Beautiful Buns


Vegan. Whole Wheat. Cinnamon Buns.

Winning!

I discovered these bodacious breakfast buns on With a Side of Sneakers, and knew it wouldn't be long before they made an appearance in my kitchen. Do you recall last month's botched bun attempt? Ever since that disastrous morning, I've been determined to roll out a new recipe (pun intended).

This recipe will defy everything you previously thought you knew about cinnamon rolls. They contain no butter or oil, and only a modest amount of sugar. Best of all, they don't require a lengthy rising time--nor a lengthy prep time--which is just what this hungry girl wants on a Saturday morning.

The trick to these ooey gooey breakfast gems is to just barely bake them 'til done--it'll give them that oozing, doughy quality of bakery buns. We drizzled (covered) the tops with a powdered sugar glaze, but if you're not in a vegan-kinda mood, I urge you to whip up a bowl of cream cheese frosting.

Now please: Do your loved ones justice and step away from that tube of refrigerated cinnamon rolls. Tubes belong to socks, tops, and flotation devices, but they certainly do not belong in your refrigerator.

Vegan Whole Wheat Cinnamon Buns
(recipe from With a Side of Sneakers blog)

These buns will change your opinion of breakfast forever. And it's a good change.

Dough Ingredients:
  • 1 cup almond milk
  • 2 - 1/4 tsp. yeast
  • 2 cups whole wheat flour
  • 1 cup bread flour (plus more for kneading)
  • 2 tsp. baking powder
  • 1/4 tsp. salt
  • 1/4 cup sugar
  • 1 tsp. cinnamon
  • 4 TBSP applesauce
Filling Ingredients:
  • 2 - 3 TBSP vegan non-hydrogenated margarine
  • 2 - 3 TBSP applesauce
  • 1/4 cup brown sugar
  • 1 tsp. cinnamon
Glaze Ingredients:
  • Powdered sugar
  • Almond milk
  • Vanilla extract
Directions:
1) Heat the almond milk in the microwave until just warm. Sprinkle yeast on top and set aside.

2) Meanwhile, Combine the dry bun ingredients in a large bowl. Add milk mixture and applesauce and mix until a soft dough forms (add more flour as needed). Knead dough for a few minutes--I cheated and used the dough hook on my stand mixer :)

3) Roll the dough out into a large rectangle. Spread with the vegan margarine, then the applesauce.

4) In a small bowl, combine the brown sugar and cinnamon for the filling. Sprinkle evenly over the dough rectangle. Roll up the dough, lengthwise, and cut into 10 rolls. Place in an 9 x 9 inch baking dish (coated with cooking spray). Cover and allow to rise briefly while you do the dishes and tidy up the kitchen :)

5) Heat oven to 350 degrees. Bake buns for 20 minutes. Combine glaze ingredients in a small bowl in your desired amounts (I just kept mixing sugar and milk until I got to the amount and consistency I wanted!). Drizzle on top, and eat up.


Wednesday, March 16, 2011

Burrito...De-Constructed

Typically, I'm a carb-a-holic. Truly.

I would likely go through a spiritual crisis if someone tried to stand in the way of my morning bowl of cereal.

Homemade bread makes me weak in the knees. And considering a fresh loaf is baked every Monday in our house, I'm a weak-kneed gal on a fairly consistent basis.

And cookies? I don't know if we should even go there. Almond Butter Cookies, Peanut Butter Cookies...the list goes on. I somehow convince myself these moist, doughy treats are "healthy" buy using natural nut butters and part whole-wheat flour. Who am I kidding?

Basically, a reduced-carb diet is diametrically opposed to any lifestyle I could ever sustain. A carb-less life is a sacrilegious existence.

But.

I must admit, friends: I'm still suffering from last week's cupcake/frosting overload situation. A girl can only stomach so much chocolate buttercream.

Thus, the veggie cleanse continues. Tonight: Burrito-in-a-bowl, featuring homemade salsa. Just what I needed to continue the cleanse. Although I went the chip-less route tonight (darn you, carb overload!), I imagine this bowl would love some crumbled tortilla chips sprinkled on top.

Never fear, fellow carb-lovers. I'm sure it's only a matter of days before I return with some flour-laden goods.

Burrito Bowl
(Hungry Spoon original)

This recipe can easily be "jazzed up" with tortilla chips, cheddar cheese, and guacamole. We kept it simple tonight, though. And it worked.

Salsa Ingredients:
  • 1 pint cherry tomatoes, halved (or quartered, depending on how large they are)
  • 4 cloves garlic, minced
  • 1 small onion, diced
  • a little veggie broth (sorry friends, I didn't measure!)
  • 1/4 cup cilantro
  • freshly chopped jalepeno pepper, to taste
  • salt and pepper, to taste
Filling Ingredients:
  • dash of olive oil
  • 2 cups frozen or fresh corn
  • 2 large bell peppers, diced
  • 1 large onion, diced
  • 1 cup fresh zucchini, diced
  • 1 can black beans, rinsed and drained
  • 4 cloves garlic, minced
  • 1 - 2 tsp. chili powder
  • 1 tsp. cumin
  • Optional: cheddar cheese, guacamole, etc. for garnish
Directions:
1) To prepare the salsa: Heat a large skillet over medium heat. Add tomatoes and cook for about 4 minutes. Add onion, garlic, jalepeno (if using), salt, and pepper. Add a dash of veggie broth if needed. Continue cooking for about 4 - 5 more minutes, and season to taste. Remove from heat. Pour tomato mixture and cilantro into a food processor and process until smooth.

2) To prepare the burrito bowl filling, heat a dash of oil in a pot over medium heat. Add corn, peppers, onion, and zucchini. Cook for about 4 - 5 minutes, until softened. Add seasonings and beans and continue to cook until heated through and the desired tenderness has been reached. Season to taste.

3) Enjoy your filling topped with homemade salsa and any other yummy toppings your heart desires :)


Monday, March 14, 2011

Vegan Cleanse Time, Baby!

After several weeks of cupcake mania in my kitchen, the muffin tins are finally empty. The cupcake liners are all gone. And there's not an ounce of frosting left in sight.

Perhaps the loudest indicator of this cupcake-madness conclusion is my stomach: She's begging me for a vegan cleanse.

Ask and you shall receive, my dear Tummy.

So, after polishing off the last, lonely chocolate cupcake with peanut butter frosting last night, I began working on this week's cake-less meal plan. That's right, folks: no frosting, no butter, and much less chocolate. I mean, it is Lent after all.

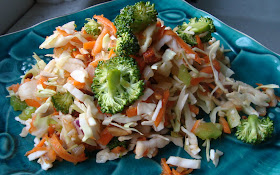
Tonight's feature: Asian Slaw with Almonds and Oranges. It all started with a bowlful of this:
Seriously. Yum.

I hope you enjoy this dish of vegan-licious-ness as much as I did.

As a side note, I settled on the following three flavors for the baby shower cupcakes: Chocolate Yogurt Cupcakes with Peanut Butter frosting, Classic Birthday Cupcakes, and Orange Creamsicle Cupcakes. We packaged 'em up to match the Dr. Seuss-themed baby-fest, and placed one cup o' cake at each guests' place setting. I can't lie: It was pretty adorable.

Alright, enough cake talk. Let's get down to those vegan goods, shall we?

Asian Slaw with Oranges and Almonds
(adapted from a Cooking Light Magazine recipe)

The soy sauce makes for a delicious vinaigrette of sorts for this crunchy, veggie-loaded slaw. If you don't have fresh oranges on hand, go ahead and sub in mandarin slices.

Salad Ingredients:
  • 1 bag of shredded cabbage
  • 2 cups broccoli florets
  • 1 cup shredded carrot
  • 1 cup chopped celery
  • 1/2 cup finely chopped red onion
  • 1/2 cup chopped, toasted walnuts
  • 1/3 cup toasted sunflower seeds
  • 2 oranges, diced
Dressing Ingredients:
  • 1/4 cup low-sodium soy sauce
  • 3 TBSP apple cider vinegar
  • 1 TBSP honey
  • 1 TBSP lime juice
  • 1 - 2 TBSP olive oil
  • 1 tsp. minced garlic
  • pinch of fresh ginger
  • fresh salt and pepper to taste
Directions:
Combine salad ingredients in a large bowl and stir until thoroughly combined. Whisk together dressing ingredients and pour over salad. Stir to coat. Season with salt and pepper to taste.

Saturday, March 12, 2011

Creamsicle Cupcakes


I've said it before, and I'll say it again:

Citrus treats should be enjoyed year-round...not just during the heat of summer, alongside a glass of lemonade.

For this reason, Orange Creamsicle Cupcakes will be included in the cupcake assortment featured at Liz's baby shower this weekend. These cupcakes are loaded with orange juice, orange extract, and even a little orange peel. I went with a lemon theme for the frosting, altering my simple buttercream recipe by using lemon juice instead of milk, and adding a dash of lemon extract.

Need a little more sweetness? A hint of decadence? Drizzle some melted white chocolate across the tops. More white chocolate only makes things better. I promise.

With that being said, I'm off to spend the better part of today preparing for tomorrow's baby-loving festival. May there be lots of games, plenty of tea sandwiches, and a bowl full of that delicious punch with a block sherbet floating on top.

Orange Creamsicle Cupcakes
(adapted from a recipe in Vegan Cupcakes Take Over the World)

If lemon isn't your thing, create an Orange Buttercream frosting by substituting orange juice and extract for the lemon juice and extract.

Cupcake Ingredients:
  • 1/3 cup oil
  • 3/4 cup sugar
  • 1/2 cup milk
  • 3/4 cup orange juice
  • 3/4 tsp. vanilla extract
  • 3/4 tsp. orange extract
  • 1 - 1/3 cups all-purpose flour
  • 1 tsp. baking powder
  • 1/2 tsp. baking soda
  • 1/4 tsp. salt
  • 1 tsp. finely grated orange zest
  • 1/3 cup white chocolate chips, dusted with about 1/2 TBSP flour
Frosting Ingredients:
  • 1/2 cup butter
  • 1/2 cup shortening
  • 3 - 1/2 confectioner's sugar
  • 1/2 tsp. lemon extract
  • 1 tsp. vanilla extract
  • 2 - 3 TBSP lemon juice
  • extra milk, if needed
Directions:
1) Preheat oven to 350 degrees. Line a muffin tin with 12 cupcake liners.

2) Combine oil, sugar, milk, juice, and extracts in a large mixing bowl. Sift in the flour, baking powder, baking soda, salt, and zest. Beat for 2 - 3 minutes. Stir in white chocolate chips. Fill cupcake liners 2/3 full and bake for 20 - 23 minutes, or until the edges turn golden brown and a toothpick inserted in the center comes out clean. Cool completely before frosting.

3) To prepare frosting: Beat the butter and shortening for about 1 - 2 minutes. Add sugar, extract, and lemon juice and continue mixing. Add additional milk if needed for the consistency. Beat for 3 - 4 minutes, until light and fluffy.

Thursday, March 10, 2011

Throw-it-in-the-Pot Dinner

Have you had a crazy day lately? A crazy week perhaps?

Home late in the evenings? Brain completely drained, and your cooking creativity out the window?

It's weeks like this that I dream of collapsing on the couch with sweatpants, banana soft serve, and my Glee re-runs on Hulu. Unfortunately, by the time I made it to this point last night, I was fast asleep before the first Gwyneth Paltrow song had been sung.

*Sigh*

But wait! There's good to come of it all...

During these times, I'm uber-grateful for throw-it-all-in-the-soup-pot dinners. Adam cleaned our cabinets of quinoa, jarred tomatoes, veggie broth, and some frozen veggies. He seasoned the pot with curry and fresh ginger, and placed a steaming bowl in front of my bags-under-my-eyes face.

Boy, do I love that man.

Eat up friends. Maybe tonight I'll make it to the first Glee ballad.

Throw-it-in-the-Pot Curried Quinoa Dinner
(an Adam original)

Since this was a fly-by-the-seat-of-your-pants kind of recipe, I urge you to get creative and use whatever YOU have in YOUR cabinets. Stick with the quinoa-curry base though...it's oh so very good.

Ingredients:
  • 1 cup quinoa
  • 2 cups veggie broth
  • 1/2 cup raw cashews, toasted
  • 1 large onion, diced
  • 5 cloves garlic, minced
  • 1/2 inch ginger, minced
  • 1 tsp. curry powder
  • 1 tsp. cumin
  • 1 TBSP mustard seed
  • 2 cans (15 oz. each) stewed tomatoes
  • 2 cups frozen edamame or peas
Directions:
1) In a small saucepan, combine quinoa and broth and bring to a boil. Reduce head to low and simmer until all the liquid has been absorbed.

2) Meanwhile, saute the onion, garlic, and ginger with a dash of olive oil--over medium heat--until softened.

3) In a large soup pot, combine the cooked quinoa, the onion mixture, and all of the remaining ingredients. Allow to simmer until the liquid has been cooked down and absorbed--about 20 minutes.


Tuesday, March 8, 2011

Birthday Rice

Our family has a long-standing birthday tradition: The birthday person provides their ideal dinner menu to my mom--who joyfully prepares it--and we all enjoy the feast packed around my parents' dining room table.

This tradition has been around for as long as I can remember--as a kid, I picked French Toast as my birthday meal every year. The mere thought of dinner involving buttery fried bread buried under powdered sugar was absolutely exhilarating for a 9 year old Kylie.

My older sister, on the other hand, always had much more sensible choices: salmon cakes, lasagna, and the like. Older sisters are so much more reasonable, aren't they?

In celebration of the Hungry Spoon Sis's 32nd year, we enjoyed a family birthday feast this past weekend. On the menu? Spinach and Black Bean Enchiladas, salad, and Spanish Rice.

My mom tried a new Spanish Rice recipe that was apparently designed to feed a high school football team. Fortunately, that meant there were plenty of leftovers for me to sneak into Tupperware and pack away in my purse.

Let's be honest, folks: They don't call me the Hungry Spoon for nothing.

Bonus: This recipe is totally vegan.

Happy Birthday, Sis :)

Spanish Rice
(recipe from Hungry Spoon Mama)

This recipe pairs nicely with quesadillas, burritos, or enchiladas (of course!). Or, as pictured above, it makes a great dinner all on its own.

Ingredients:
  • 1 cup brown rice, uncooked
  • 2 - 1/2 cups veggie broth
  • a dash of olive oil
  • 1 green bell pepper, diced
  • 1 large onion, diced
  • 1 tsp. minced garlic
  • 1 tsp. chili powder
  • 1 can of diced tomatoes, drained
  • 1/2 cup salsa
Directions:
1) Place rice and veggie broth in a saucepan. Bring to a boil, reduce heat, and simmer (covered) until all of the liquid is absorbed--about 20 - 30 minutes.

2) Meanwhile, heat a dash of olive oil in a skillet over medium heat. Add bell pepper and onion and saute for 3 - 4 minutes, until tender. Add garlic and chili powder and saute for about 1 - 2 more minutes.

3) In a large bowl, combine rice, pepper and onion mixture, diced tomatoes, and salsa. Season with salt and black pepper as needed.

Sunday, March 6, 2011

Gal Pal Recipe Share

If I've said it once, I've said it a hundred times: What would we do without girlfriends?

Some require phone connections, with 600 miles between you. Others you get to see on a weekly basis. Regardless of how you connect to your gal pals, you always know they're right there for a phone chat, shopping trip, or hilarious game night.

And, if you have the mad cooking and baking skills of my friends, they're usually ready for a recipe share.

Today's recipe comes from my dear friend Amy, previously famous on this blog for her homemade eggnog (on my deathbed, I've requested that an IV bag of her holiday beverage be hooked up to my shrimpy veins).

Today, however, she's famous for the Black Bean and Corn Salsa pictured above. So simple. So versatile. And so very, very scrumptious.

While the obvious serving suggestion is with tortilla chips, this tasty salad/condiment goes well with most any savory dish. This weekend I enjoyed it atop a simple sweet potato saute (cubed sweet potatoes, onions, bell pepper, garlic, and chickpeas sauteed until browned).

So, how will you consume your Black Bean and Corn Salsa? Perhaps you're a chip dipper. Or a burrito-filler? Or maybe...just maybe...you like to eat it right out of the bowl with a spoon :)

Black Bean and Corn Salsa
(recipe from Amy)

Ingredients:
  • 2 cans of shoepeg corn, rinsed and drained
  • 1 can (15 oz.) black beans, rinsed and drained
  • 3/4 cup red onion, finely diced
  • 3/4 cup red or green bell pepper, diced
  • 2 jalepeno peppers, diced
  • 1/2 cup balsamic vinegar
  • 1/3 cup olive oil
  • 1 - 1/2 TBSP dijon mustard
  • a dash of honey
  • 1/4 cup fresh parsley, chopped
  • salt and black pepper, to taste
Directions:
Combine corn, beans, onion, bell pepper, and jalepeno peppers in a large bowl. In a small bowl, whisk together balsamic vinegar, olive oil, mustard, honey, and parsley. Pour over veggies and stir to coat. Season with salt and pepper.

Saturday, March 5, 2011

Yes...ANOTHER Meatless Burger

For those of you who are tired of my maniac meatless burger posts, I'm truly sorry.

It can all be blamed on the Veggie Burger Every Which Way cookbook.

Yes, this fabulous little cookbook has turned me into a veggie burger-obsessed mad woman. I crumble them on salads. I sandwich them between homemade buns. Occasionally I dream about them.

Friends, I almost ate a veggie burger for breakfast last week (there are worse morning meals, no?)

Miraculously, tonight's recipe didn't even come from the aforementioned veggie burger cookbook. Instead, it came right from the pages of Bryant Terry's Vegan Soul Kitchen. Adam pulled these suckers together in under 30 minutes, and we sandwiched them between a batch of homemade cornbread buns.

The not-so-secret-secret ingredient? Peanuts, of course. Did you think I could post a veggie burger recipe that didn't contain a nut and/or nut butter? (on that note, I also apologize to my loyal readers with nut allergies.).

Tonight's lesson: If you are what you eat, I've definitely turned into a mashed bean patty covered in guacamole and pickles. I'm not ashamed.

Black Bean + Peanut Patties
(adapted from Vegan Soul Kitchen Bryant Terry)

Don't be fooled by the short ingredient list for this recipe--it has a unique blend of flavors, highlighted by cider vinegar and sea salt. We topped ours with fresh guac, but a spicy chipotle mayo (or nayo) would also work nicely.

Ingredients:
  • 1 can (15 oz.) black beans
  • 1/2 onion, finely diced
  • 1/2 cup unsalted peanuts, chopped
  • 1/2 tsp. dried thyme
  • 1/4 tsp. cayenne pepper
  • 1 TBSP apple cider vinegar
  • 1/4 cup + 2 TBSP water
  • 1/4 tsp. salt
  • freshly ground black pepper to taste
  • 1/2 cup finely chopped bell pepper
Directions:
Preheat oven to 350 degrees. Coat a large baking sheet with cooking spray. Combine all ingredients in a food processor and pulse until well-combined. Shape mixture into 4 - 6 patties. Place patties on the baking sheet and bake for 10 - 12 minutes, or until bottom has turned golden brown. Flip patties and bake for an additional 10 minutes, or until bottom has turned golden brown (full disclosure: I did not use a timer when they were in the oven! I was roasting veggies at the same time, and thus never kept track of time, so these are merely time estimates).