Pages

Tuesday, August 31, 2010

A Lonely Red Pepper

When autumn first begins to show its colors, soups and stews creep back onto the weekly menu at our house. There's perhaps nothing more comforting on a chilly fall afternoon than a warm bowl of soup with homemade bread or biscuits.

Well, fall isn't here yet, and it topped 91 degrees in Morgantown today, but I was bound and determined to sneak soup onto the menu! It wasn't my fault though...

I blame it all on the pepper. The lonely, red bell pepper.

She seemed so forlorn and desperate, sitting in the fridge, crying out, "Roast me, Kylie! Hold me over the open flame and roast me, girl!" I wasn't about to let the lonely red pepper down.

Consequently, tonight's dinner was one of my favorite winter soups: Roasted Red Pepper & Corn Chowder. The ingredient list is quite simple, with the bulk of your time spent roasting and preparing the pepper. This soup is light and healthy, and merely needs a slice of crusty bread to accompany it, or maybe a small side salad. I couldn't resist Cooking Light's recommendation to sprinkle the top with Blue Cheese crumbles though (if someone suggests the addition of fine cheese to a meal, it's an unusual day that I turn it down).

So, here is the story of a lonely red pepper. If you're not in the mood for her melo-dramatic and depressing story, you can skip right down to the recipe :)

She started glossy and fresh, straight from the fridge (I forgot to get her "before" glamour shot.). We held her over an open flame...
She wasn't so glossy and shiny anymore.
After we let her sit, covered in a bowl, for 10 minutes, we peeled the charred skin away.
Naked, lonely pepper!
Now she's ready to make some chowder...
Roasted Red Pepper and Corn Chowder
(adapted from a Cooking Light recipe)

Do your lonely red pepper justice and make sure you roast it! This recipe calls for the corn on the cob to also be roasted or grilled (which would be a-mazing!), but since I forgot to do so, I simply pre-cooked it briefly before adding it to the soup. In the winter, when corn on the cob isn't as plentiful, I've been known to just use frozen corn with this recipe!

Ingredients:
  • 3 red bell peppers, roasted (see picture story above)
  • 3 ears of roasted or grilled corn
  • 2 TBSP olive oil (approximate)
  • 4 cups chopped onion
  • 28 oz. jar diced tomatoes
  • 1 can chicken or vegetable broth
  • 1/4 tsp. salt
  • 1/4 tsp. ground black pepper
  • Crumbled blue cheese
Directions:

1) Coarsely chop bell peppers and cut corn off the cobs.

2) Heat oil over medium heat in a large soup pot. Add onion and cook until tender, about 5 -7 minutes. Stir in tomatoes, corn, and bell pepper. Increase heat to high and stir in broth, salt, and pepper. Bring to a boil. Reduce heat, and simmer for 10 -20 minutes. Cool for 20 minutes.

3) Puree the soup in a food processor (I did this in several shifts since we have a mini-prep food processor. I pureed a bowl-ful of the soup, and placed the pureed mixture in a large bowl. I repeated this procedure until about 3/4 of the soup had been pureed. I left the last 1/4 of the soup un-processed, as I wanted to keep a few of the corn kernel whole for texture).

4) Re-heat soup if needed. If you're a cheese-head like myself, sprinkle blue cheese crumbles over individual servings of soup.

Monday, August 30, 2010

Strawberry Cake...Take 2


Do you recall that one special Christmas season when--new to baking and eager to show off your skills--you decided to bake gingerbread cookies for the neighbors, and accidentally added cumin instead of ginger? I'm sure you remember throwing the cookie dough away in defeat, wondering if you'd ever bake again. That was a special Christmas, wasn't it? (True story in my life. December 2007. Awesome, Kylie).

Friends, yesterday marked an epic baking disaster of similar proportions. I enthusiastically set forth to bake Cooking Light's Strawberry Layer Cake with Cream Cheese Frosting for our family dinner. True to my tortoise-in-the-kitchen mantra, I slowly and methodically laid out the ingredients, ensuring the butter had softened to just the right temperature and the strawberries were pureed to the perfect consistency.

As I measured and mixed, I absent-mindedly nodded my head while Adam discussed genetic protein modification (standard procedure around here). Before I knew it, I had thoroughly mixed 2 1/2 teaspoons of salt to the batter.

Salt Cake anyone?

Pressing forth, like all devoted amateur bakers do, I baked the Salt Cake, topped it with Chocolate Hazelnut Butter, and called it Adam's (quite unhealthy) after-work snack for the week. Miraculously, he's enjoying it, and "saltiness" isn't quite as strong as one might expect.

The story ends happily though. During Round 2 of Cake-Baking Sunday, the Strawberry Layer Cake came out beautifully. The result was a very dense, moist cake with a sweet strawberry flavor. Because I love combining citrus flavors with berries, I added lemon zest and a splash of fresh lemon juice to the frosting. Ultimately, a nice summery dessert to conclude an August porch-dinner.

Lesson learned: Save the DNA-talk for after the cake goes in the oven.

Strawberry Layer Cake with Cream Cheese Frosting
(adapted from a recipe found in Cooking Light magazine)

Cooking Light explains that, due to the dense nature of this cake, it doesn't rise very high. The cake ends up being pleasantly moist and quite tasty.

Ingredients:
Cake:
  • 1 1/4 cups sliced strawberries
  • 2 1/4 cups all-purpose flour
  • 2 1/4 teaspoons baking powder
  • 1/8 tsp. salt
  • 1 1/2 cups granulated sugar
  • 1/2 cup butter, softened
  • 2 large eggs
  • 2 large egg whites
  • 1 tsp. vanilla
  • 1 cup milk or buttermilk
  • Additional strawberries for garnish
Frosting:
  • 4 oz. reduced fat cream cheese
  • 1/3 cup butter, softened
  • Splash of lemon juice
  • Splash of vanilla
  • 3 cups powdered sugar
  • very finely grated zest of one lemon (about 1/2 tsp - 3/4 tsp.)
Directions:

1) Preheat oven to 350 degrees and grease to 8 inch round pans with cooking spray.

2) Place sliced strawberries in a food processor and process until smooth. Set aside.

3) In a medium-sized bowl, combine flour, baking powder, and salt. In a large bowl, beat the butter and granulated sugar on medium speed until well blended. Add eggs, one at a time, beating well after each addition. Beat in egg whites.

4) Add flour mixture and milk alternately to the butter/sugar mixture, beginning and ending with the flour mixture. Add pureed strawberries and beat until just blended.

5) Divide batter evenly between the baking pans. Bake at 350 degrees for 30 minutes, or until a toothpick comes out clean. Cool cakes on a wire rack, in pans, for 10 minutes. Remove from pans and cool on a wire rack completely.

6) To prepare frosting, beat the cream cheese, butter, vanilla, and lemon juice with an electric mixer at medium speed until blended. Gradually add powdered sugar and lemon zest.

7) Place one cake layer on a plate and spread with 1/2 cup frosting. Top with remaining cake layer and spread sides and top with remaining frosting. Garnish with additional strawberries.

Note: Avoid participating in lengthy discussions about DNA while creating this cake. If not, you may risk sodium overload for the day.

Sunday, August 29, 2010

Savory Stuffed Tomatoes


Tomato season is blissful, isn't it?

In August, these plentiful fruits arrive like they own the place. They're big, they're red, and they're so much better than the tasteless variety you bought at the grocery store in February. The only problem (if you can call it that), is that they often ripen in mass quantities, leaving to you to cry out in dismay, "So many tomatoes! So little time!"

This is precisely the call I received from my parents this weekend, desperate to unload what seemed like bushels of ripe tomatoes (My dad is gardening genius, and produces ridiculous amounts of vegetables every year. Unfortunately, he failed to pass that gene on to me. I can kill an aloe plant just looking at it).

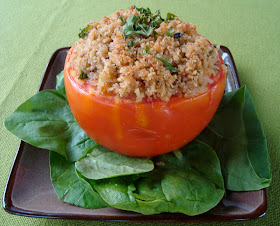
After happily packing up my free produce from their yard, Adam converted the tomatoes into a meal that would be cruel not to share with you. Toasted pine nuts, fresh herbs, and parmesan cheese are the hallmarks of this recipe, found in the Vegetarian Meat and Potatoes Cookbook by Robin Robertson. Let me tell you, friends: this a recipe made to impress. Not only does it taste outstanding, but it presents beautifully, making it the perfect meal for guests.

So, on this relaxing Sunday night, we invited the family over for a classic August porch dinner and enjoyed dad's tomato harvest to the fullest :)

Bring on the tomatoes!

Savory Stuffed Beefsteak Tomatoes
(recipe from Robin Robertson's The Vegetarian Meat & Potatoes Cookbook)

We served the tomatoes with a simple fresh spinach salad and garlic bread. Perfect for company!

Ingredients:
  • 4 large ripe tomatoes
  • 2 TBSP olive oil
  • 1 onion, minced
  • 4 cloves of garlic, minced
  • 2 cups cooked brown rice
  • 1/4 cup pine nuts, toasted (you MUST toast them! It brings out all the flavor)
  • 1/4 cup fresh parsley, chopped
  • 1/4 cup fresh basil, chopped
  • 1/2 tsp. dried oregano or marjoram
  • 1/2 tsp. salt
  • 1/4 tsp. freshly ground black pepper
  • 1/2 cup dry Italian-seasoned bread crumbs
  • 1/2 cup freshly grated Parmesan cheese
  • Garlic powder to taste
  • Additional parsley to garnish
Directions:

1) Preheat oven to 375 degrees. Lightly grease a small baking dish.

2) Slice the tops off of the tomatoes and carefully remove the pulp and seeds, leaving the tomato shell intact. Chop the pulp and place in a colander/strainer to get rid of the excess liquid. Set aside.

3) Heat 1 TBSP oil in a large skillet over medium heat. Add the onion and cook until softened, about 5 minutes. Add the garlic, tomato pulp, rice, pine nuts, parsley, basil, marjoram or oregano, salt, and pepper. Cook on low heat for 5 minutes, until excess liquid has been absorbed. (If the mixture is too liquidy/wet, your tomatoes will not stay firm when you bake them!) Remove from heat and allow to cool slightly.

4) Stuff the rice mixture into the tomatoes and place in the prepared baking dish. In a small bowl, combine the remaining 1 TBSP oil with the bread crumbs, Parmesan, and a sprinkling of garlic powder to taste, tossing with a fork to mix. Sprinkle over the tomatoes. Top with a little parsley to garnish.

5) Cover with a sheet of aluminum foil and bake until the tomatoes are a little soft and the filling is hot, about 15 minutes. Remove the foil and bake for 5 additional minutes to brown the topping.


Saturday, August 28, 2010

Snack Attack


As you know, I've likened my cooking speed in the kitchen to that of a tortoise.

At other times, my kindred animal spirit can be found in a squirrel. Similar to these fast-moving, beady-eyed little rodents, I tote food around with me like it's my job. I'm not talking bags of pretzels or pre-packaged energy bars, either. I'm talking little tupperware containers of prepared snacks. I know: I'm the most mom-like, childless woman I know.

What can I say? I typically get hungry about 3 hours after eating, and I've never been one to ignore my grumbly stomach (She's my favorite internal organ! I could never let her down.). I choose to prepare snacks to tote around with me (like a beady-eyed squirrel), because I'd much rather eat whole, fresh foods, than something pre-packaged and loaded with preservatives (thank you, Michael Pollan).

If you're looking for a healthy change to make this week, consider joining me in the squirrel movement and packing your snacks to take with you....everywhere! The key is making sure you have some stick-to-your-ribs protein. Some of my favorites:
  • Strawberries and blueberries mixed with dried cranberries and toasted nuts or seeds (see today's recipe below!)
  • Part-skim ricotta cheese drizzled with honey and eaten with melon or berries
  • A carton of Stoneyfield organic yogurt
  • Roasted edamame
  • A banana or apple with a spoonful of natural nut-butter for dipping
  • Homemade trail mix: dried cranberries, toasted pumpkin seeds, toasted walnuts, Nature's Valley granola
This afternoon, after we rocked the never-ending-yard-renovation circuit, I made a tasty fruit n' nut bowl to hold me over until dinner. Easy-peasy. And so worth it.

Fruit n' Nut Snack Bowl

Ingredients:
  • 4 strawberries, chopped
  • Blueberries (about 1/3 cup)
  • 2 TBSP walnuts, chopped and toasted
  • 2 TBSP dried cranberries
Directions:

Mix ingredients and eat up! Your stomach (and metabolism!) thank you :)


Friday, August 27, 2010

Banana Cookies Conquer Your Kitchen

I know what you're thinking...and it's not good.

With a post title like this, you're likely assuming that I'm about to rave about some grain-filled, seed-filled, dry fruit-loaded, crumbly flax cookie.
Hooray for health food!

You'd be so wrong.

Although I've made my fair share of the afore-mentioned seed-filled flax cookies (and I personally love them!), tonight I'm going to review a cookbook I've been lusting after in Barnes & Noble for the past month: Vegan Cookies Invade Your Cookie Jar. Although I don't own the cookbook, I've read it cover-to-cover while hanging out at the book store (I know, I'm so cool), and I'm officially in love.

Authors Isa Chandra Moskowitz and Terry Hope Romero tempt your sweetest tooth with mouth-watering pictures and recipes that exceed my expectations of both food creativity and delicious-ness.

Among dozens of others, you'll find recipes for:

- Peanut Butter Chocolate Pillows (Remember grandma's chocolate-peanut butter balls that she only busts out at Christmas? Yea, they've got nothing on these).

-Spiced Sweet Potato Blondies (You know how I feel about sweet potatoes.)

-Lazy Samoas (And you thought only the Girl Scouts knew how. Nope! You can replicate them at home with this recipe)

-Oreos (That's right: completely vegan, completely heavenly)

-Chocolate Chip Cream Cheese Brownies (I'm speechless on this one. They're just. That. Good.)

Okay, enough teasing. I'll dish on a recipe now :)

I tried their Banana Oatmeal Cookie recipe this week, and as far as "healthy" cookies go, I'm in love. This is a fabulous treat to try if you're:

a) craving banana bread but don't want to wait an hour for it to bake.
b) in need of something sweet, but a little on the lighter side.
c) seeking a use for a quickly-darkening banana hanging around your kitchen.
d) in love with bananas and adore desserts.
e) just plain hungry.

Remember: the riper the banana, the better the flavor. When bananas start turning black, I often freeze them and save for pancakes, cookies, and breads.

Happy Baking!

Banana Oatmeal Cookies

Don't be intimidated by the slightly lengthy ingredient list...it's well worth it! With vegan and vegetarian treats, you'll often find more seasonings and flavorings which help compensate for the lack of richness from dairy products.

Ingredients:
  • 2/3 cup mashed banana
  • 2 TBSP flaxseed
  • 1/4 cup milk (skim or soy)
  • 1/2 cup oil
  • 1/2 cup maple syrup
  • 1/4 cup honey
  • 1 tsp. vanilla
  • 2 cups all-purpose flour
  • 1 1/2 tsp. cinnamon
  • 1/4 tsp. nutmeg
  • 1 tsp. baking soda
  • 1/2 tsp. salt
  • 2 cups oats
  • 1 cup chopped walnuts or pecans
Directions:

1) Pre-heat oven to 350 degrees and grease a cookie sheet.

2) Combine the first seven ingredients (through the vanilla) in a large bowl. In a separate bowl, combine remaining dry ingredients.

3) Add dry ingredients to wet ingredients and mix until thoroughly incorporated.

4) Drop by tablespoon-fuls on baking sheet. Bake for 7 -8 minutes, or until edges are lightly browned. Yield: about 2 1/2 - 3 dozen small cookies


Thursday, August 26, 2010

Rockin' Edamame

Who amongst us hasn't completely rocked out to Lady Gaga in our kitchens?

Friends, tonight I had the kitchen all to myself for a little while. I was armed with a bag of frozen edamame, my recently updated iTunes, and some dance moves that would make Shakira cry. Armed and dangerous, I enjoyed a "rock out" dance session while I prepared some roasted edamame and entertained Dora with my smooth moves.

Obviously, Adam arrived home from work, only to walk in on me prancing in front of the oven to Justin Beiber's "Somebody to Love." Oh, the shame.

After leaving you with such an awkward image of myself, let's just get to the food, shall we? Roasted edamame is one of the tastiest, easiest side dishes I make, and it has quickly become a new favorite of mine. It's fantastic as a simple accompaniment to a main course, but it also makes a perfect add-in to a big salad. Lately, I've been taking a little tupperware-full to work with me, and snacking on it when I hit the 3pm hunger-attack.

We just buy our edamame frozen (quick and easy!). It's in the frozen veggie section at just about any grocery store. They're loaded with fiber (up to 9 grams per serving!), and are tasty plain and raw if you don't have time to roast them.

After the recipe, I'll leave you with the rest of tonight's cooking-session playlist (it doubles as my new workout playlist). I've already embarrassed myself enough with the whole Justin Bieber thing, why not just put the rest of it out there?

What song gets you dancing in the kitchen?

Roasted Edamame

Ingredients:
  • 16 oz. bag of frozen edamame (or more if you want)
  • Italian dressing (maybe about a 1/4 cup? A little less? Just enough to coat the edamame very lightly)
  • Generous sprinkling of garlic powder
  • A bit of salt and pepper, to taste
Directions:

1) Preheat oven to 425 degrees.

2) Combine all ingredients in a large bowl (only use enough salad dressing to very lightly coat the edamame!). Pour onto a baking sheet, keeping the edamame in a single layer.

3) Roast edamame approximately 8 minutes. Remove from oven, stir edamame. Return pan to the oven and roast for another 8 minutes.

3) Meanwhile, dance around the kitchen a little.

4) Remove edamame from oven and assess for done-ness. I like mine to lightly brown (as shown in the picture above). You can return it to the oven if it still needs to roast for a few more minutes. Just keep an eye on it!

5) Do a celebration dance. Need inspiration? Check out embarrassing-kitchen-dance-playlist:

Tonight's Kitchen-Dancing Playlist
  • "Take it Off" - Ke$ha
  • "Yea!" - Usher
  • "Forever" - Chris Brown
  • "Let Me Blow Ya Mind" - Eve
  • "Get Your Freak On" - Missy Elliot (Oh yes I did!)
  • "If I Had You" - Adam Lambert (the embarrassment is growing as I type this)
  • "Tik Tok" - Ke$ha
  • "Somebody to Love" - The Beiber-Man


Wednesday, August 25, 2010

The Tortoise Makes Calzones


I am not a speedy cook.

I take my time chopping vegetables. I love to let things simmer, and allow flavors to marry. I rarely prepare ingredients ahead of time, which can drag a recipe's "prep time" well into the 1 hour mark. Did I mention that I frequently spill things (like 3 pounds of mashed sweet potatoes) and thus must take lengthy breaks to clean up my messes?

Rachael Ray would cringe to watch me move through the kitchen at the speed of tortoise.

Tonight, however, I've got a speedy little number that even I, somehow, managed to produce in less than 30 minutes.

The evening began with a desperate craving for some stellar cheese. I'm talking good quality, rich in flavor, melt-in-your mouth cheese--a splurge well worth eating, right? Fortunately, we had some gorgonzola on hand, and a full carton of ricotta. Sounds like the beginning of something beautiful.

The result was Broccoli and Cheese Calzones from The Big Book of Vegetarian. Move over Pizza Hut and your smug little P' Zones. You couldn't compete with these if you tried (disclaimer: I've never actually had a P' Zone, but I imagine they don't hold a candle to The Book's pockets of broc & cheese).

Perhaps one of the most attractive qualities of this recipe is its versatility as a crowd-pleaser. Some of the more zealous meat-eaters out there often claim that vegetarian food is too "mousy" or not filling enough. But this recipe--of epic cheesy and tasty proportions--will undoubtedly satisfy even the firmest carnivores among us. Plus, it's ready in a jiffy (Wow. Did I just use the word jiffy?).

Eat up, friends :)

Broccoli & Cheese Calzones
(adapted from a recipe in Kathy Farrell-Kingsley's The Big Book of Vegetarian)

You could also add 3 chopped green onions to this recipe if you'd like. We didn't have any on hand, so I just omitted them!
Ingredients:
  • 10 oz. package of frozen broccoli, thawed and squeezed dry
  • 1/2 cup part-skim ricotta cheese
  • 1/2 cup crumbled Gorgonzola cheese (or other blue cheese)
  • 1 cup shredded Asiago cheese
  • 1 teaspoon garlic
  • salt and ground black pepper to taste
  • 10 oz. tube refrigerated pizza dough
Directions:

1) Preheat the oven to 425 degrees. In a medium bowl, mix the broccoli, ricotta, Gorgonzola, Asiago, and garlic powder. Season to taste with salt and pepper.

2) Using a flour-coated rolling pin, roll pizza dough onto a floured surface. Divide into 4 squares/rectangles. Place approximately 1/3 - 1/2 cup of filling on one side of a dough square. Fold the other side of the dough square over, and seal the edges together. Repeat with remaining three dough squares.

3) Cut a slit in the top of each dough square (to allow steam to escape).

4) Bake for about 15 minutes, until golden brown.

5) Love the cheesy goodness...


Tuesday, August 24, 2010

Almond Butter Meets Cookie


Once upon a time, a big scoop of almond butter met a sugar cookie. They got to know each other better--they flirted, got a little fresh, and then (oops!) one day the hanky-panky went too far. Two became one, and they created some beautiful offspring.

Thus begins the story of the dreamy, creamy, and oh-so-buttery Almond Butter Cookie.

If you're new to the almond butter world (shout out to my friend Jackie!), I hope this recipe makes you a believer. For any seasoned almond-butter-eaters out there--let this one go to the top of your list.

Awesome added bonus: These cookies are vegan--no eggs! So no worries of under-baking the cookies (an important note if you're a chronic under-baker and lover of all things cookie dough like myself).

(Completely Unbiased) Testimonial: I wanted to wait until Adam gets home to enjoy the cookies together. How sweet. Couldn't do it, folks. The cookies were calling my name: "Psssst. Hey Kylie. Yea, You. Eat up, girlfriend!"

I'm sure he'll understand.

Almond Butter Cookies
(I found this recipe a couple years ago at Love Like a Vegan blog--her past recipes are still posted, but the blog no longer has active posts)

Imagine this little delight as Almond Butter meets Sugar Cookie.

Ingredients:
  • 1 cup all-purpose flour
  • 1 tsp. baking powder
  • 1/2 tsp. baking soda
  • 2 TBSP sugar
  • 1/4 tsp. salt
  • 1/3 cup almond butter
  • 1/2 cup pure maple syrup
  • 1/2 tsp. vanilla
  • 1/2 tsp. almond extract
  • 3 TBSP oil
Directions:

1) Pre-heat oven to 350 degrees. Grease a cookie sheet.

2) Combine all dry ingredients in a large bowl.

3) In a small bowl, combine almond butter, maple syrup, extracts, and oil. Add almond butter mixture to dry ingredients and mix until fully incorporated.

4) Place rounded tablespoon-fuls of dough (or a little more!) on the cookie sheet. Bake for 7-8 minutes, or until lightly browned around the edges.

YIELD: Makes 11 - 12 cookies.


Monday, August 23, 2010

Magnificent Monday Salad


They always get the shaft and we humans love to hate them. Poor, poor Mondays.

Tonight, you get a simple recipe for a dinner-salad that is sure to improve your mood--because you're eating GOOD food--and energize you for a week of healthy living! (roll eyes here in response to my irritating optimism).

But first, to make today a little brighter for you (or simply to make you roll your eyes again), I'm going to keep my Miss Optimism Pants on and think of all the reasons today--a Monday--ended up to be an alright day.
  • I found a parking spot at work, even though it was the first day back for WVU students.
  • New jar of almond butter = new batch of almond butter cookies tonight.
  • Did an awesome 1980s-type workout with Karen Voight and her leg warmers this morning.
  • Got a fun package in the mail from my friend Katie with "Green Team" T-shirts and some sweet iTunes and Coldstone gift cards (I plan on using all items the same day like a maniac: downloading music on my Ky-Pod...listening to the music while I wear the T-shirt and run the 5K...then celebrating with a a bowl of Cake Batter ice cream. Because we all know that one of the best reasons to exercise is so we can have an extra bowl of ice cream. Or is that just me?)
  • Renewed my Triple A membership (okay, this is just getting pathetic).
Enough of Miss Optimism Pants. I hope you'll try this nifty salad for your dinner tomorrow. You'll feel goooooood afterwards....

Mega-Veggie Dinner Salad
(makes about 3 servings)

This baby will keep you full hours after your done. Crunchy, tasty, filling and healthy. What more could you ask for to brighten your Monday? Or any day, really :)

Ingredients:
  • 2 ears of corn, cooked and cut off the cob
  • 1 can of chickpeas, rinsed and drained
  • 1 onion, diced
  • 4 cloves of garlic, minced
  • 1 cup of fresh garden tomatoes, chopped
  • 1 avocado, diced
  • 1 bell pepper, chopped
  • Gorgonzola cheese
  • toasted pumpkin seeds
  • Fresh chopped spinach, stems removed
  • Salad dressing of your choice (we made a honey-chipotle vinaigrette with olive oil, honey, white wine vinegar, oregano, ground red pepper, paprika, chili powder, cumin, allspice, ground black pepper)
Directions:

1) Saute onion and garlic with a little olive oil over medium until just tender (2-3 minutes).

2) Optional: Toast chickpeas. I toasted them dry in a pan over medium heat until they were lightly browned. Sprinkled a little garlic powder on at the end (again, this step is optional).

3) Build your salad. Alas! An all-you-can eat, build-your-own salad option that doesn't involve a plastic sneeze guard shield, a line to wait in, or small children with sticky fingers.

Sunday, August 22, 2010

Irresistible Eats: Flatbread + Bean Dip


Okay, Okay, I know what you're thinking:

"Bean dip? Is she kidding? What's exciting about a salty, pasty, brown dip I can buy in a can at the store?" (unappealing description added for dramatic effect).

Furthermore, you might be wondering why I would suggest that you make you're own flat-breads. Again, a product that's readily available at the store, and would take far less time for you to throw in your grocery cart, right?

Here's my sales pitch: you will LOVE this dip. It's so rich in flavor--the garlic and toasted pine nuts make the most delightful combination. I was practically licking the food processor bowl after Adam removed the dip (unpleasant image for the readers. I apologize.). It could also serve as an awesome sandwich topping--forget the mayo and over-processed "spreads"...you'll be a condiment all-star in the lunch-room with this little number :)

Added bonus: If you're cooking for someone (including yourself) who is not a fan of beans, this is the perfect dip/spread for you. Once Great Northern beans are put through a food processor, their soft, smooth texture makes it almost impossible to detect the presence of beans. It ends up looking like a bowl of garlic and chive mashed potatoes.

And the flatbread? SO simple! Only 4 ingredients, very little prep time, and the fresh-browned taste from your own skillet is unbeatable. I assure you you'll never want to go back to purchasing pre-made tortillas again.

Final note: the flatbread and bean dip complete our Saturday night dinner menu when combined with the Curried Quinoa and Mango salad. Maybe you'll want to try this menu some night this week?

Garlic & Pine Nut Bean Dip
(recipe by Adam)

Ingredients:
  • 1 15 oz. can of Great Northern beans, rinsed and drained
  • 4 cloves of garlic, minced
  • 2 - 3 TBSP finely chopped onion
  • 1/4 cup fresh, chopped parsley
  • 1/4 cup toasted, chopped pine nuts
  • a drizzle of olive oil (probably 2 TBSP)
Directions:

Put all ingredients in a food processor and pulse until smooth and thoroughly combined. Use as a dip for veggies, crackers, pita chips, homemade flatbread (!), or as a sandwich spread.

Homemade Flat Bread
(Recipe from Taste of Home's Simple and Delicious magazine)

Make sure you keep the pan heavily coated with cooking spray as you go (I re-spray each time I turn the bread, and each time a new piece goes on). Keep the heat on medium-low to prevent scorching or burning.

Ingredients:
  • 2 cups all-purpose flour
  • 1/2 tsp. salt
  • 1 cup water
  • 3 TBSP olive oil
Directions:

1) In a large bowl combine the flour and salt. Stir in the water and oil.

2) Turn dough onto a floured surface (I add flour as needed if the dough is too sticky). Knead 5 to 6 times. Divide dough into 8 portions.

3) Roll each portion into a 7 inch circle.

4) Coat a large nonstick skillet with cooking spray. Cook each flatbread over medium heat for 1 minute on each side, or until lightly browned.

5) Enjoy your flatbread with the garlic & pine nut bean dip, with hummus, or as a wrap for your sandwich.

Saturday, August 21, 2010

Curried Quinoa...and Running Feet

I'll get to tonight's rockin' dinner in a minute...mmmmmm....

Curried Quinoa & Mango Salad and Homemade Tortillas with Garlic-Bean Dip

A brief intermission, though, to check out these feet. They ran 3.1 miles this morning:

First let's establish something: I am not a runner. Nope. Never have been.

When it comes to exercise, I'm an aerobics & circuit training gal. Honestly, if the only form of exercise I did for the rest of my life involved keeping my 6:00am DVD-date with my favorite star trainers (Jillian Michaels anyone?) I'd be perfectly happy.

Although I'm not a runner (and likely never will be), I did set a personal goal earlier this year to make sure that I run a 5K at some point in my life. No time like the present, right? So, we'll be running the Toys for Tots 5K Trot at the end of September.

I'll keep you posted occasionally as I progress through my "rigorous" training schedule (Would you call running once a week rigorous?)

Enough about exercise though! Let's move on to food. Amazing food. Food you should cook for dinner TONIGHT. Let's talk curry salad.

Found this little number in the latest edition of Cooking Light magazine, and I knew I had to try it. The recipe calls for quinoa, but if you're out (like we were), you can substitute another grain (we used bulgur), or even couscous. If you use bulgur, you can follow the same cooking method I use in my bulgur salad recipe.

This dinner rocked my socks off. The curry seasoning was a perfect addition to the sweet mango, red pepper, and crunchy celery. Although the recipe doesn't call for it, chickpeas would be an awesome add-in to this salad as well.

We enjoyed our curried salad with homemade flat bread and some out-of-this world garlic-bean-pine nut dip Adam created. But I'll get to the bread and bean dip tomorrow :)

For now, feast your eyes on this salad, and start your grocery list.

Curried Quinoa and Mango Salad
(Adapted from a recipe found in the September issue of Cooking Light magazine)

As I mentioned previously, we used bulgur since we didn't have quinoa on hand when we made this tasty salad. Feel free to sub in the grain of your choice, or couscous.

Ingredients:
  • 1 cup quinoa, or grain of your choice
  • 2 cups broth to cook your quinoa in (you can use veggie or chicken broth, or water if you don't have broth on hand)
  • 1/2 tsp. salt
  • little olive oil
  • 1 onion, diced
  • 2 cloves of garlic, minced
  • 1 1/2 tsp. curry powder (approximately! I actually didn't measure tonight :)
  • 1 peeled and diced ripe mango
  • 1/2 cup diced celery
  • 1 red bell pepper, chopped
  • 1/4 cup chopped fresh cilantro
  • 1/3 cup raisins
Directions:

1) Combine quinoa and broth (or water) in a medium saucepan; bring to a boil. Cover, reduce heat, and simmer approximately 15 minutes or until tender. Remove from heat, stir in salt, and cool completely.

2) Heat oil in a medium saucepan on medium heat. Add onion and garlic. Heat for 1 - 2 minutes or until onion is tender. Add curry powder, stir, and remove from heat.

3) Add onion mixture, mango, celery, cilantro, raisins, and bell pepper to the quinoa. Stir to coat. Season to taste.

4) Wow. We were impressed with Cooking Light tonight.

Stay tuned...I'll post the out-of-this-world bean dip and flat bread recipe tomorrow :)


Friday, August 20, 2010

Sometimes you feel like a nut...


Sometimes I feel like a nut? How about every day I feel like a nut?

I am literally a nut butter fanatic.

Almond butter cookies? Absolutely.

Sunflower butter stirred into my oatmeal? You've got it.

Spoonful of natural peanut butter..right out of the jar? Every day, my friends.

Why do I bring up nut butters today, you ask? During my lunch break I walked down to Adam's office to say hello and, lo and behold! The man surprised me with a treat from the Mountain People's Co-Op--a treat that I didn't even know existed: Roasted Hazelnut Butter. This is not the amazing chocolatey Nutella stuff we typically associate with hazelnut butter. Nope, the only ingredients in this baby are roasted hazelnuts. With surprises like this, I'm wondering if I need to stop by his office more often during lunch break?

I broke right into my hazelnut butter as soon as I got home from work--slathered it on half of a banana, sprinkled it with granola, drizzled some honey, and voila! The perfect snack to hold me over until tonight's dinner at Madeleine's.

I'm going to be certain to post some of my favorite nut butter recipes for you in the coming week or two (watch out for the Almond Butter Dark Chocolate cookies. Whoa.). Today, however, I'm keeping it simple with my quick after-work snack. Try it with any nut butter of your choice. Which one is your favorite?

After-Work Snack
I've always got to have a small snack when I get home from work--it gives me energy for a good dog-walk, and lets me relax and enjoy the wait while we prepare dinner.

I apologize for the unappealing picture--I was without natural sunlight and snapped this picture in a bit of a hurry (Dora was anxiously waiting for her walk!)

Ingredients:
  • 1/2 banana
  • 1 1/2 teaspoons hazelnut butter (or nut butter of your choice)
  • Sprinkling of sunflower granola
  • Drizzle of honey

Thursday, August 19, 2010

Second-Day Slaw


We've all seen it, and we've all eaten it. You know what I'm talking about.

You've watched your cousin or little brother smother it on a hot dog with a little too much enthusiasm.

You've also seen it sit lonely, and hauntingly shiny, in its store-bought plastic container at the family cookout.

It's a staple at any American summer barbeque. And it desperately needs a makeover.

Yes, cole slaw, I'm talking about you.

Let's get something straight. In my pre-vegetarian days, I had no fear when it came to traditional deli cole slaw. I loved it. My favorite way to eat it? Heaped on a homemade pulled pork barbeque sandwich. Almost makes me want to eat meat again. (Not really, but I felt like being a little over-dramatic).

Adam, however, refuses to touch anything that looks like it has mayonnaise in it with a 10 foot pole. Thus, with the many new changes that came with married life, came my new perspective on cole slaw.

In addition to bruschetta, we also made Clean Eating's Edamame and Chickpea slaw last night. This vinegar-based slaw is tangy, filling, and far lighter than it's creamy, traditional counterpart. It is critical that you make this slaw one full day before you plan on eating it though! When eaten immediately after it's prepared, the flavors are too sharp and have not had time to blend. So, we call it "Second-Day Slaw."

Before I give you the recipe though, I thought you should get a glimpse of my two favorite mammals (Adam and Dora). While we eat dinner on the porch each evening, Dora has rejected the plush grass in favor of passing out in the massive dirt pile from our yard renovation. And, just to prove that there is a yard renovation, I've got a picture of Adam's latest extraction from the yard :)


Edamame and Chickpea Slaw
(from Clean Eating magazine)

This recipe makes A LOT...so if you're just cooking for 2 people, or even 4, I recommend cutting it in half

Ingredients:
  • 1 can of chickpeas, rinsed and drained
  • 1/4 teaspoon salt
  • 4 teaspoons olive oil, divided
  • 1 head of cabbage, shredded
  • 1 head of purple cabbage, shredded (we forgot the purple this time, so you won't see it in the picture)
  • 1 cup shelled edamame (you can get them in the frozen veggie aisle at any grocery store)
  • 3/4 cup bell pepper, thinly sliced
  • 1 1/2 cups shredded carrot
  • 4 green onions, chopped
  • 2/3 cup apple cider vinegar
  • 2 TBSP honey
  • 3 cloves of garlic
  • 1/2 tsp. caraway seeds
  • 1/2 tsp. ground black pepper

Directions:

1) Preheat oven to 450 degrees. Place chickpeas in a single layer on a baking sheet coated with cooking spray. Drizzle with 2 tsp. oil and sprinkle with salt. Bake approximately 20 -30 minutes, tossing occasionally. Remove from oven and allow to cool.

2) Combine remaining vegetables in a large bowl. Add chickpeas and set aside.

3) In a small bowl, whisk together the vinegar, honey, garlic, caraway seeds, black pepper, and remaining 2 tsp. olive oil. Pour over slaw and mix to coat.

4) Refrigerate overnight, and mix well before serving.


Wednesday, August 18, 2010

Tomatoes and Basil, Oh My!


If you've taken on the task of gardening this summer, you've likely been reaping the benefits for the past several weeks. While our herbs have been growing beautifully, it would be an understatement to say that our tomatoes have been a disappointment. Not sure if it was their location on the porch, or the fact that Adam left me in charge of caring for them for a 5 day period in July (oops!), but the poor plant now looks a bit sickly and forgotten.

Lucky for me, however, my parents have been kind enough to share their plentiful tomato harvest with us :)

The quick, easy, and summery solution to an abundance of tomatoes and some basil in your window? Bruschetta!

My sister and her boyfriend joined us for dinner on the porch this evening, and bruschetta was the perfect centerpiece to our spread of salads.

The amounts of everything in this recipe are quite flexible--be creative!

Basic Bruschetta

Ingredients:
  • 2 lbs. tomatoes
  • 1/2 onion, finely chopped
  • 3 large cloves of garlic, minced
  • 3 TBSP red wine vinegar
  • 2 TBSP olive oil
  • 1/2 cup fresh basil leaves, chopped
  • Salt, pepper, and dried oregano to taste
  • Parmesan cheese
  • Whole grain baguette, thickly sliced
  • Olive oil (to drizzle)
  • Garlic powder (to sprinkle)
Directions:

1) Cut open tomatoes and discard pulp. Chop tomatoes into small chunks. Place tomato chunks in a bowl.

2) Add the onion, garlic, red wine vinegar, olive oil, basil leaves, salt, pepper, and oregano to tomatoes. Stir to combine and allow to sit for about an hour so flavors can blend.

3) Lightly drizzle each piece of baguette with olive oil and sprinkle with garlic powder. Place baguette slices on a baking sheet and toast in the oven (425 degrees) for approximately 5 minutes, or until lightly crisp.

4) Remove baking sheet from the oven and turn each baguette slice over. Top each baguette slice with the tomato mixture. Sprinkle parmesan cheese on top. Return baguette slices to the oven for approximately 3-4 minutes.


Tuesday, August 17, 2010

Blue Ribbon Baking: Part 2


Peanut butter + Chocolate is a difficult food combo to top. Let's face it: it can be dangerous. I was the kid who used to sandwich a Reese cup between two Oreos at junior high band camp--I'd eat these little sandwiches in speedy succession between street marching practices of "Hang on Sloopy" (Does anyone else ever lust after the metabolism of their once 13-year-old self?).

Fortunately, I've progressed beyond my simplistic band camp combination to better days of peanut butter + chocolate. Tonight, dear friends, you are about to take in a recipe that will make you forget about Oreos and Reese cups, and will get you running to the kitchen to start baking. Feast your eyes on Peanut Butter Blondies with Milk Chocolate Frosting.

I stumbled upon this recipe when I was reading one of my favorite food blogs, Joy the Baker. Joy's baking genius puts her in the ranks with Ina Garten and Paula Deen, but far better because her wit and hilarious side notes keep you laughing while you cook. I was scanning through the blog on a Saturday night, and decided to bake a batch (you know, around 9:00pm...when all the dieticians recommend that you start making and eating brownies.). The next thing I knew, I was entering these puppies in our county fair baking competition and voila! Joy won me a blue ribbon :)

These peanut butter & chocolate brownies are rich, dense, and perfectly textured. They're the perfect dessert to give as a gift or serve to company because they turn out magnificent every time. So, tonight I applaud Joy and her awesome baking brain.

Your homework: Bust out the peanut butter, grab some milk chocolate, and surprise your favorite person with a plate of these blondies tomorrow.

Class dismissed.

Peanut Butter Blondies with Milk Chocolate Frosting
(Recipe courtesy of the amazing Joy the Baker)

Be certain you make the chocolate frosting for these...if the brownies could talk, they'd probably tell the frosting: "You complete Me."

Ingredients:
  • 10 Tablespoons unsalted butter cut into 5 cubes
  • 2 cups dark brown sugar
  • 1 cup smooth and natural peanut butter
  • 2 eggs
  • 2 teaspoons vanilla extract
  • 1/2 teaspoon salt
  • 2 cups flour
  • 1 teaspoon baking powder
  • 1/2 cup semi-sweet chocolate chips (or more if you prefer. Or, as Joy suggests, you may want to try mixing in some chopped up Reese cups. Sounds dangerously good to me)

Directions:

1) Preheat oven to 325 degrees F. Grease a 9×13-inch pan.

2) In a medium saucepan over medium heat, melt butter and sugar together until the butter is just melted. Remove from the burner and allow to cool for 5 minutes, then add the peanut butter. Stir until incorporated. Allow to cool for 5 minutes more, then whisk in the eggs and vanilla extract.

3) Whisk together salt, flour and baking powder. Add dry ingredients to the wet ingredients. Stir until just incorporated. Add chocolate chips. Pour the thick batter into the prepared pan and smooth out. Bake for 20-25 minutes, or until a skewer inserted in the center of the blondies comes out clean. Remove from the oven and allow to cool to room temperature before frosting.

Milk Chocolate Frosting

  • 6 Tablespoons unsalted butter, softened
  • 3 Tablespoons unsweetened cocoa powder
  • 1/4 teaspoon salt
  • 1 1/2 – 2 cups powdered sugar
  • 3 Tablespoons milk
  • 3/4 cup milk chocolate chips, melted

In the bowl of a stand mixer, beat together the butter, cocoa powder and salt. Add 1/2 cup powdered sugar followed by 1 tablespoon milk. Beat well. Add another cup of powdered sugar, followed by 2 tablespoons of milk. Melt milk chocolate chips in the microwave or in a double boiler. Add melted and slightly cooked milk chocolate the frosting and beat to incorporate. Add the final 1/2 cup of powdered sugar if you need a bit more thickness. Spread evenly over peanut butter blondies.